This has been an enjoyable return to the world of cutting, sanding, and glueing styrene. The windows are all setup in the sides. So now it's time to work on the vents in the top of the gables. These aren't particularly difficult, but I do think that you need to follow a process so that you are happy with the result. My apologies to those who find this simplistic.
The vent in the gable I've tried to match using clapboard siding, as close as I could find compared to the plan. The trick is to cut out all the gable 'vents' from the one piece of clapboard, and glue surrounds in the same order as my fancy diagram. This then means you can hold the vents against a square and use tweezers to manoeuvre the small bits of styrene. If you have a styrene chopper, then use it to ensure the pieces are the same size as each other and the two upright sides.
Once you've glued 1 and 2 in place let them cure a bit and then on with 3 and 4. Let that dry completely before you trim them up.
It's hard to see but there is a mark at the top of the louvers, to make sure you don't install them upside down.
What's the glossy black thing for? I hear you say, well its black perspex that I use for gluing styrene on as it doesn't bond to the styrene when gluing. However it's a bugger to get a photo without the workbench LEDs getting in the shot.
The four vents are close to being the same size, however they won't be, just expect it, I know I do. So that I don't frustrate the life out of myself, just number an opening to a vent. That way you are trying to fit one vent to one hole, not picking up a different one each time and having to reshape a hole that will quickly become too large. You end up with a side with lots of lines and numbers, but isopropol will fix it easy!
I don't know about you, but I've found a little extra time out at the modelling bench of late. It has certainly helped keep me sane. The vents were done over two nights, during the week. A simple part that shows up really well when completed.
A quick update today, there has been some real progress on the modules with the back scene board frames being completed, so a new post shouldn't be too far away.
Enjoy the rest of the week,
modelling time is the key to happiness!
Oorroo!
Geoff.
Wednesday, April 29, 2020
Sunday, April 19, 2020
The Twins, part 1
There has been many different ways of communicating to each other over the years here in Australia. Well before the telephone we had the telegraph. Since 1858, in NSW, the telegraph line linked us together, often bringing together post, telegraph, and money order to the one location. At Bulli, that was the case. The standard design for this office was doubled at Bulli, building them back to back, with a what seemed like a shared wall in the centre. I'd love a photo of the interior of this building, but unfortunately I've not been successful in sourcing one.
The building itself is not really very complex. I've sourced some novelty siding that appears the correct spacing, so out with the hobby knife and away we go! It feels like ages since I had a building project to work on, and so far it's been good. The matching of available windows from the Grandt line or Titchy group, to the scaled plan appeared a little difficult. I found two that were a good fit on the Grandt line site, however the postage was enormous, compared to the packs actual price. I continued the search through the stash, and found some that would be a fair enough fit, even though they were a twelve pane window, some careful trimming would see that fixed.
I've been cutting out enough walls to build a double office for my layout, and an extra one, not sure why, maybe in case I bugger up something on the first, then I'll have some spares.
The photo just illustrates where I got to yesterday, and once I had a little bit of time today, I've completed the second wall cut out.
The side with the double gable and the two single windows in each, is the trackside view of the building. The side with two windowsill each gable is the public side of the building. This side also has window awnings over each, something that will be fun to model because of the gentle curve in them.
The plan I have for the building is interesting as it does not have a front elevation plan. This makes it a bit difficult to replicate the front doors, they were a pair that opened inward, that much I can see from the floor plan. It does not help me with the height of the door, or whether there was any venting above it? So a little Modellers licence here. I will be modelling the doors opened as the interior I have a good plan for, with benches and the like all marked, along with good detail of the fireplace, so we shall see. In my head I have the scene populated with people, and sourcing figures at a reasonable cost/quality is proving challenging.
I'll finish there for now. Enjoy the new week,
stay safe,
Oorroo!
Geoff.
Wednesday, April 15, 2020
Ballasted deck bridge for HH
Just over the boarder near Tenterfield there are some great examples of ballasted deck bridges. The area has been a favourite of mine for many years now. The Sunnyside bridge, and many other features along the line make it an enjoyable drive. Even after many trips there are still bridges and sidings to explore. The need to do this sooner, rather than later.as some of the bridges have begun to be removed. There are a few that are off the main road, and these ones are the ones I'm chasing. Another time for sure.
The bridge is to be on the left hand module, hopefully with a scene similar to the one caught in these photos. I've still to confirm the placement of the trackwork, and that will effect the placement of the bridge. For now I'm working on the scenery boards for each of the three main modules. This combined with the trackwork, for me, is a little fluid, and I guess that's why I like modelling a made up location, based on a real location. I'm sure the purists out there have issue with this, however as I only model small layouts I need to be more flexible. A home layout is not on the horizon for a while, and that's already planned, with a set location.
During a few of my visits to this location I have many measurements of timber sizes and spacing, but you know, I still think I've missed a few. So when I need a break from the bench work it will be out with the basswood and bolt detail for sure!
This last photo will hopefully be the scene I'm trying to replicate on the layout. There are other photos I have of the distant horizon, however I'm not sure I will be replicating the same in paint. The back scene painting should probably be the next thing I do as a distraction from track work. I'm a firm believer in having a few different projects on the go that you can cycle through.
That should be it from me till I actually have some progress to post, some photographic evidence of some modelling.
enjoy your week, only a few days to go!
Oorroo!
Geoff.
Monday, April 13, 2020
Post Easter Post
Hi Everyone!
Recently, I don't know about you, but I've had a little free time at home. It's turned out to be a good thing, we've stayed safe, remembered how to cook and entertain ourselves, and most importantly there's been some modelling time in the garage!
It has been a case of something old appearing new again, namely a weekly post on the railway blog. Let's see how I go, after all this is the first.
There has been a bit of thinking time, time to re assess, time to rethink what I thoought was a good idea, and the best bit? Progress!
I've been working on the track plan to confirm that the plan was actually going to work, on the ply, as it were. So far so good. The centre module is mostly the goods area and small town scene. The spacing between tracks, the curves, and working with the point geometry has been time consuming. I'm pretty sure that all will be well, nothing is glued down yet so it should be ok.
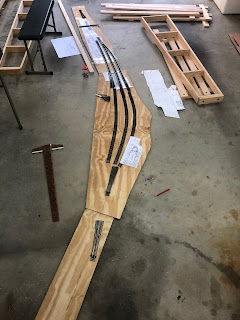
I went on to work on the centre module today, adding the front and rear scenery boards. If you look at the centre front, it's very low, the 'hollow', and at the rear on the left is the high point of the layout. It always feels a little more easy to see what you're creating when these go on I think.
Recently, I don't know about you, but I've had a little free time at home. It's turned out to be a good thing, we've stayed safe, remembered how to cook and entertain ourselves, and most importantly there's been some modelling time in the garage!
It has been a case of something old appearing new again, namely a weekly post on the railway blog. Let's see how I go, after all this is the first.
There has been a bit of thinking time, time to re assess, time to rethink what I thoought was a good idea, and the best bit? Progress!
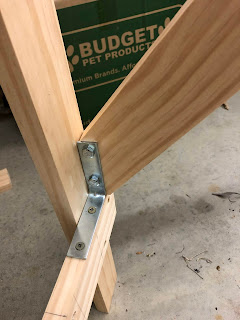
Here's a couple of photos to show the front three modules up on their legs. The diagonal in the second photo is to support the two separate leg frames, so that they are free standing. The idea behind this being that the layout can be set up by one person, however I hopefully won't need to do that. The bolts goes through the timber and lock into a t-nut in the rear of the diagonal.
I've been working on the track plan to confirm that the plan was actually going to work, on the ply, as it were. So far so good. The centre module is mostly the goods area and small town scene. The spacing between tracks, the curves, and working with the point geometry has been time consuming. I'm pretty sure that all will be well, nothing is glued down yet so it should be ok.
I went on to work on the centre module today, adding the front and rear scenery boards. If you look at the centre front, it's very low, the 'hollow', and at the rear on the left is the high point of the layout. It always feels a little more easy to see what you're creating when these go on I think.
That's all for this weekend, I'm hoping for some more time out there soon, next up is the backscenes, and their painting. The fun part, or at least the start. With starting this part of the layout at least I get to make use of the endless cloud photos I've been taking.
Enjoy your week, stay safe,
Get out there and enjoy your hobby!
Ooroo!
Geoff.
Subscribe to:
Posts (Atom)


