Sunday, September 20, 2020

The Backscene begins

There's been a little more time of late to spend some time out in the trainspace. I use that term, 'trainspace' very deliberately, as it is a double carport, with aluminium slats down either side to aid in security, but there's no dust removal at all. In one side is a car, in the other side are various bits and pieces of bric a brac, and discarded furniture, even a motorbike, and squeezed amongst all that is my hobby space. The extra time has been helpful in reducing the number of non railway related equipment, however there is more to do in that space. 

 The area I have to work in also must accomodate the three scenery modules, legs, and backscene boards. There are three scenery boards to work on, each one about 1700mm long and 600mm high. Luckily I have a shelf area that is at a good height to sit the boards on to begin the painting, squeezed in just in front of H's car.

The blue paint that is graduated down with the addition of extra white and some pale blue colours.
The subtle colour changes are a little harder to replicate than I thought. Through a few videos I've watched on youtube, I've changed what I was doing, and how I was applying the paint. There are many to watch, so choose carefully, some could send you to sleep in minutes!

The clouds themselves have been a bit of an issue, as I've not been happy with some previous incarnations, so there are a few extra layers of paint. I'll jump straight to where I'm up to, with a photo to show you a bit of progress so far.

In this photo you can also see a couple of blue lines toward the bottom that will eventually be the horizon line and the higher one the limit of background foliage.

I have taken so many photos of clouds, with the look I was aiming for. The reality of what my actual ability to paint, compared to those photos is, I guess, the reason so many people buy a photographic backdrop. Anyway I've received some very helpful feedback, that has enabled me to improve what I have been doing, to those that offered constructive comment, thank you!
Above, is a photo I referred to as I attempted to paint some clouds. The difference between ability and reality is rather large. 

The clouds are mostly done on this canvas, so its on with some background trees. I've thrown around various shades of olive green paint, darker in the rear, then a few highlights over the top. It is nothing too involved, as a fair amount of them will be covered by some of the foreground trees that are going to be just behind the Station area. My thought was to have the background fairly close at the Station, then as you move towards the left of the layout, the horizon moves further away. We will see how that ends up.

Above you can see the first layer of background trees going in. Yes it is just a few layers of various greens.
On top of this, below, you can see the start of the trees in the area behind the Station.


I have tended to do an area at a time, that way it doesn't all look the same as if I'd gone straight across the whole of the background with the same colours. This is just something I do, also with my scenery, so there is variation. The one thing I have to be careful of is not making the colours too 'muddy', the trick seems to be to mix the colours on your tray rather than on the end of the paintbrush.

The posts have been a fair way apart, so I might stop it there for now, after all there's still alot more to do!
Have a great week!
Oorroo!
Geoff.
 

Friday, July 10, 2020

The Dreaded Backscene

The thing is Railway Modellers don't see themselves as Artists.
They don't see themselves as Carpenters, Electicians, Negotiators, Researchers, or really as anything rather than 'just modellers'.
 However for the learn-ed amongst us, we know the truth! We are all of the above. Sure our level of capability will be different, but the fact remains that we are in a hobby that goes across many different skill sets. I find it interesting that there are many out there that seem to specialise in one particular facet of the hobby. I believe we need a very balanced approach to gain a level of enjoyment, and indeed success, at what we are trying to create.

For me I thoroughly enjoy the scenery part of layout construction. That starts with the backscenes painting, in my method of construction. It works in with the scenic boards we put up on the front and rear of our layouts, so I always have these installed at least before moving onto some painting. Some of you may wonder why front and rear scenery boards? I've had to go down that road as I will need to remove the backscenes for ease of transport.

A reminder here also that as the layout is for show display the backscenes needed to be light, tall and easily locked together. Starting with the lightness I built a timber frame out of 19x40mm pine, with a centre bracket. The timber sits on its slim face, so that it looks similar to a picture frame, and enables plenty of meat in the joins to keep it square. As far as locking together goes it is fairly basic. At each end of the central board I've attached a piece of half round trim. It's diameter is half of the thickness of the pine frame. That way I attach two ends on the centre board to line up with the front of the frame, then on the other two boards I attach the half round to the rear. The idea being that they would lock against each other when bolted in place.

 Then I've used calico purchased for painting the backscenes on. It is a simple task as long as you follow a couple of basic rules. The first being that attaching the calico starts in the centre of the longest sides, on both the top and bottom of the frame. You then work out from the centre to the ends, using cut tacks to secure at least a double fold over of the calico. The tacks are secured on the rear of the frame. Once all sides are secure you can do either of two things. If you've put on the calico with no effort in keeping it taught, then your next job is to shrink the calico to the frame. You will need a water sprayer and a hairdryer. Fill the spray bottle with recently boiled water, spray it on the front and rear of the calico, then dry it as quickly as you can with the dryer. The result should be a taught canvas ready to receive your paint.
There is a second choice, that being as you tack the calico in place, you do it whilst keeping it taught.
So after completing either way you will need to undercoat the calico, then after drying you are ready to go. I should also mention the the calico will shrink a little as the undercoat dries.

In my last post I put up a photo of the backboards attached, and here's another, a panoramic to get all three modules in. You can see the scenery boards attached to the front and rear of the modules. Whilst I had these all together I did use a pencil and mark the outline of the boards against the canvas, ready to paint now and with a guide as to how far down to paint.


Note also the way the boards sit together without being able to see through between then, the curse of a modular layout.
We are almost to the paint, but we need to decide just what we are going to paint, and how we do it. I approach this part as a series of smaller parts, building on the last. That way I'm able to do a bit when I have time, and I'm not locked into having to have a large block of time just to be able to complete a

project. Little wins along the way help to keep us feeling good about our hobby/progress, and that in 
turn keeps us motivated. How often do you hear about someone that's done something, taken them ages, and they've not been happy with the result? Probably all of us, that's why little wins is the way forward.
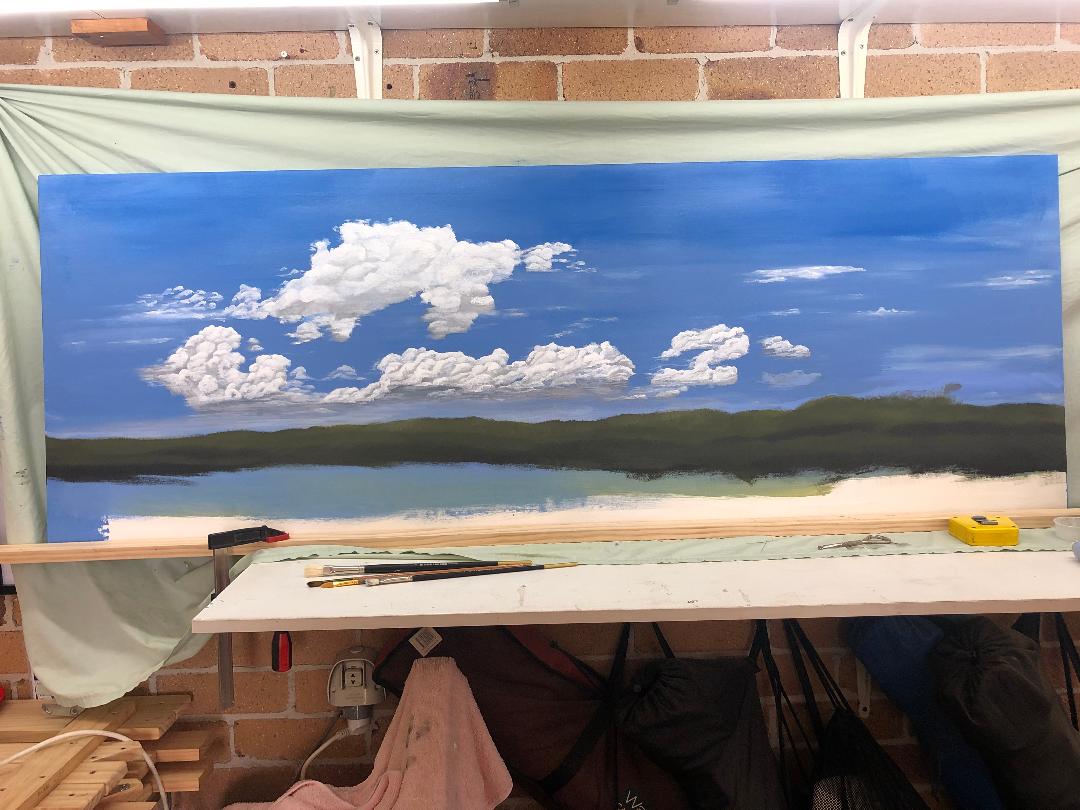
I paint the sky and clouds in stages. A photo here will help.

Before any clouds wispy or fluffy, are even thought about starting there is the blue of the sky behind them. All of us will have a way of approaching this, mine is to start in the 'back' and work to the 'front'. So simply put,
1. Sky background from top a deep blue to bottom a lighterblue.
2. Wispy bluish, not white clouds added next, noting how they are almost a solid colour to the left hand side lower part of the photo, but on the right the lighter blue is visible on the tree line.
3. Rear of fluffy clouds added, then more front clouds added only after rear ones are dry.

Make sense? This is to suit my layout too, so I want some depth in the photo in the sky. The 
foreground, trees or mountains will change depending on what you are trying to copy.
In a previous post I put up this next photo, and it gives you an idea of what will happen behind the Station, but that's only a small part of the new layout.


The left hand module on the layout is mostly scenery, so it will have a more distant focus, as can be seen in the next photo.

It's quite a different look to the Station area, but I wanted to create a very different look for the left hand end of the layout. It will be fun bringing it all together. 

So the clouds begin with the blue sky first, so we will start there.
Enough to digest for today I think,
Enjoy your week,
Be kind to yourself,
Ooroo!
Geoff.


Sunday, July 5, 2020

Station building begins

Today I thought it worth making a start on the next project, that being the Station building. There is still a little to be done on the Telegraph & Post Office, unfortunately I'm waiting on some parts to arrive in the mail before I can paint and weather it and call it done.
The Station is essentially three buildings linked by covered walkways, so I've decided to build it in three separate parts. The centre is the main building, the second with the lamp room and walkway, and the third the Gents toilet and walkway. I spent a little time with the scanner, and changing the percentage change from the scan, to a scale sized plan. A little bit of time, and some calculations, and a scale sized plan is the result.

The local hobby store closed near me the other week, so I had to go back to another one I've refused to go to as the stock levels are so poor, and the staff, ordinary at best. How they survive and the local with fantastic prices, service and stock levels failed, I've no idea. To my surprise .040" styrene was not available. I did pickup a car siding sheet that will do the same. I was informed tha stock levels were a result of covid19, we shall see.

I began by drawing up all the walls in the elevation on one sheet. The beautiful part of the siding is that it makes it easy to count boards and make all of them the same height, across all the elevations.
I must admit there's been a little head scratching when taking into account the thickness of the siding, and then adjusting the width of the elevations required.

,
Then there's the addition of the roof profile to allow for when cutting the elevations out. This is all pretty straight forward stuff, but I think if I'd had a little more in the way of suggestions of how lto build a styrene building from scratch I would have saved plenty of time, bandaids, and extra sheets of styrene purchased. So if there happens to be someone out there who's not giving this scratchbuilding thing a crack, please, leave me a message and let me know what you'd like to build.

The windows have been cut, and trial fitted. The lower part to this photo shows the trackside elevation sheet, that will be needed soon. It measured and fitted beside another roofline cutout from a previous project.

The floor has now been cut out in some fancy scribed siding, and you can see the busy street side elevation, to the plain flat rail side elevation. The central room will have internal walls to help keep the model square and to provide a solid base for the roof. This building will be a little more complex than the post office, however the principals are the same, and it can be broken down into smaller tasks that all fit together. This has quickly become the method I return to, as I find it easier to complete steps or mini projects to help keep moving things forward.

That may do for now, hopefully there will be some modelling progress this week. I've a few other things on the go at the moment. There's the painting of some figures, I've been inspired by a recent article in the 'Australian Journal of Australian Modelling', well worth supporting this Australian
manufactured magazine, for the modeller that wants to learn/do more. Then there's the progress on the backboards, maybe a photo here.

So you can see, things are moving forward, a couple of projects at a time.
Have a great week,
Hug those who matter,
Ooroo!
Geoff.

Sunday, June 14, 2020

How do we run a layout during a show?

You've made the time to go out, probably for the day. You may well be by yourself. You may be meeting some friends there. It's been ages since you've been to a Model Railway Show, so expectations are high, a little bit of nervous energy as you wait to pay your entrance fee...then you are in!

We've all been there, we all look for something different. That the hard part really, as everyone does have a different idea of how to present a layout.

I have a few pet hates, these are not directed at anyone, I swear! My biggest peeves, in no particular order:
-Locomotives working so far above scale speeds.
-Inattentive layout presenters.
-Rollingstock from different locations, run together.
-A mix of weathered, and non weathered rolling stock.
-Layouts not being run until a defined closing time.

Yes I know the flood gates will probably open, sorry.

So what to do about it? Well in this covid 19 time that we live, I've had a little free headspace to have a think about it. I think we should have a dialogue about what we would like to see, and how we would do it.


Here's a few chicken scratchings that I put together. I will be running steam on HH, so that's the focus. What have I missed? What about a set program that you have as a roster for the day, so that those who are interested will make the time to return?
 I, personally would like to see that. It would even work for Club layouts, say with steam 10-12, diesels 1215-1230, you get the idea. You could even have more detailed information like the movements of trains, or locations and a rough idea of what that would mean.

I've always wanted to give people a reason to stop, to linger, that way they feel more comfortable in asking questions. If someone turns up at your layout, and they are the only one, then in my experience if you don't give them a reason to stay, to be comfortable, then they will move on, with many questions left unasked. Railway Modellers are for the most part loners, there aren't too many that are resilient enough to stand in front of their community and share their efforts. Those who aren't presenting, tend to be the quiet ones, easily startled, you get it, si?

When I had Splitters, I had created a 'history' for the location, with details of rollingstock and what was transported on the line. I was then faced with people wanting to go and see what was still there. So then I added a sheet of the explanation of what I was trying to achieve in my Proto-Freelance modelling efforts. So people are prepared to stop and read, let's use that and give them a reason to pause out the front of your layout.

We've all had quite some time away from shows this year, and what have you learnt about our hobby during this down time? I've had time to re assess what we do, how we do it, what matters, and how we present it to the public.

If you have some opinions, please, share them. I'd love a discussion about what we do, could do, or should do.

Have a great week, live in smiles,
Ooroo!
Geoff.

Sunday, June 7, 2020

The Twins, finishing off, well almost

There's been a fair bit going on at our place for a few weeks now. The modelling bench has been a welcomed distraction. 

I've moved forward with the building of the Post & Telegraph office, on to the fiddly bits that can seem to take ages to complete. The verandah roofing with all that this brings. The bits are the guttering and what happens under the gutters. Then there's the verandah roofing, and the verandah posts.

In this really poorly focussed photo you can get an idea of what I've been working on. There's the barge boards on the end of the roof, the gutter and under it the facia. The gutter is U channel with a section of .040" square styrene glued to the underside of the 'gutter' so that the back of the gutter is flush with the back of the styrene. These I make separately in sections ready to use when I need them.

The verandah posts fit into a styrene base of about 3mm high, and made up out of two pieces of angle, as illustrated above. By doing this I can have the building base, separate from the building, separate from the roof, all so I can paint each part separately. There was some outside help with this idea, and it came from an online session with modellers from around Aus and one from the UK, thanks guys!

Here you can see the posts on the verandah, fitted into their base. Since taking the photo I've re-aligned the base on the outside posts, as they were a little off being upright. The roofing is being glued on also, I've used Campbell's corrugated iron, I love this stuff! 
The building is coming together pretty well. Most of the gutters and roofing is done, there is just downpipes, a rainhead to go at the gable gutter, and after receiving some great suggestions from a facebook comment, I will be doing ground plumbing fitment also.

I'm not too far away from painting this now. I will be working on the interior this week. Then I'm going to make a start on the Station complex. It is a much bigger building than on Splitters, so a good challenge, and a step up in building with styrene.

There are a couple of projects on the go at the same time, and the backscene frames are nearly ready to have some blue paint applied. This is one of my favourite parts of layout construction as it sets the theme and especially the scenery style. So many people seem to be worried about this part, lets see how we go.

A new week ahead, another cool one, perfect for modelling, enjoy your week,
Ooroo!
Geoff.


Sunday, May 17, 2020

Model Inspiration from Photographs

The idea of using photos as inspiration for modelling is not something new. If it be a photo of a prototype that you like, loco, location, or building design, it's worth being in your collection.
For me, I try to find photos in the time period I model, so that clues as to how to create the scene may be revealed.
This photo is not a location pick, but it does show something that took my eye.
 The photo is of Cockle Creek Station, located on the Main North, unfortunately all of these buildings are long gone. The reasons for keeping a copy of this photo are actually many, now that I started listing them, in no particular order:
1. The proximity of the bush to the rear of the Station, on both sides of the line.
2. The detail of the roofline on the end of the Station building.
3. The fencing around the end of the platforms, and location of gas lights.
4. The wheel ruts from wagons, and other assorted horse drawn vehicles.
For sure I've missed a few, but these are the ones that stood out to me. The back scene is quite different to many, as normally the open space is what we view with a distant horizon. I plan to paint part of the area behind the Station, as close to this idea as possible. The baseboards on this part of the layout will add to the depth in an area only about 300mm deep.


Tenterfield Station in 1907, the photo shows a very clear area beside the main building. The simple fence that separates the land from the local area. The awaiting horses and wagons are a scene well worth replicating to set your layout to a particular time period. I think for me, the means of transport is one of the main things I will be relying on when there are no trains in the scene.


This photo is a real favourite of mine, for many reasons. The E class loco looks so clear, the detail in the photo is outstanding, even down to the open spectacle windows in the cab. I especially like the surface of the metal as it appears on the front of the loco, it certainly isn't smooth. Also worth noting is the shiny nature of the finish of the boiler, compared to the saddle tanks. Then there are the gentlemen in the photo, the style of dress, the pride they show in being photographed beside their pride and joy. Looking around the locomotive there isn't any signs of a sleeper, even though it looks to be an earthen ballast, it certainly is up to the rails.
Behind all this is the tree line of very typical eucalypts. Love it! The Sedum that people use to construct trees, would be perfect to re create this scene.


 This next photo is of a goods loading area in Pennant Hills, I believe . The wooden boxes for the transport of goods is so different to what we see today. Everything is manual, many hands to make light work. The louvre vans behind are all open ready to receive the goods also. For me the actual recreation of this scene is on my list of 'must do's'. I've a jig hidden away to re create the boxes using basswood. It's simple, but monotonous work, and you would need so many to create something even close to this.
What do you think about when you look at this photo?
How about the lack of iron on the roof. What about the two coloured posts? The width of the weatherboard on the building beside, and its lower roof line. The missing picket on the fence. The dress of the men, the high waisted pants, the waistcoats, the way they wear their hats, no two are the same.

The photos I have in my collection are more of the same you see above. They inspire me to try to do better. They give me something to aim for. They remind me of a time when life was hard, probably smelly, but definitely quieter, more focused, and raw. Through my modelling I'd like to try to capture something of this time. I hope for those of you who don't have any photos, that you may see the value in doing some collecting as well. By all means share one of your favourites with me in the comments.

Have a great week,
hug your family, 
Oorroo!
Geoff.


Sunday, May 10, 2020

The Twins, Part 3

This week there's been a bit going on, and only a short time available for modelling. The benefit of a modelling bench that you can leave a project in progress is a real advantage, and it's allowed some progress on the twins. Heres a progress shot of the four walls being glued together, and the advantage of having multiple squares can be clearly seen.

So why all the squares? Well theres one on each end that is up against the upright walls, and also up against the underside of the eaves. Then on the left there is a square on the inside of the upright wall to keep the walls at ninety degrees to each other. One last one that is against the floor that keeps the wall inline with the floor.
I would love to hear if you have a trick for squaring up walls to each other. I seem to take ages in this part of the build,whilst others would turn out a dozen buildings in one weekend.

The walls are all together, the centre wall is slightly off centre, that way the floor and the internal wall will slip inside and be aligned. The reason for this is so that I can detail and paint the interior more easily.


The roof is a bit of a process, however the above photo shows how I begin. The two sides of the gable are measured and cut as one piece with a shallow cut dividing the two. A snap of them in one direction, then align them on top of the roofline. Then I cut and place a piece of styrene rod in the cut, apply the glue to hold them all together, and in alignment. I've done this a few times and I do find it excellent for stabilising  the roofline at the correct angle ready for adding more detail.


The two gables are sitting and drying, as well as the two verandah floors for each end of the building. The floors will attach to the floor of the building and have all the verandah posts attached. That way when the floor is slipped inside the building the posts will fit inside the verandah roof.

 I do enjoy working with styrene, and recently I purchased a bottle of the tamiya thin cement, and it's been great to work with, and has a handy brush attached to the lid.

Lets all hope for some time to get some modelling done this week.

Have a great week,
Oorroo!
Geoff.

Wednesday, April 29, 2020

The Twins, part 2

This has been an enjoyable return to the world of cutting, sanding, and glueing styrene. The windows are all setup in the sides. So now it's time to work on the vents in the top of the gables. These aren't particularly difficult, but I do think that you need to follow a process so that you are happy with the result. My apologies to those who find this simplistic.
 The vent in the gable I've tried to match using clapboard siding, as close as I could find compared to the plan. The trick is to cut out all the gable 'vents' from the one piece of clapboard, and glue surrounds in the same order as my fancy diagram. This then means you can hold the vents against a square and use tweezers to manoeuvre the small bits of styrene. If you have a styrene chopper, then use it to ensure the pieces are the same size as each other and the two upright sides.
 Once you've glued 1 and 2 in place let them cure a bit and then on with 3 and 4. Let that dry completely before you trim them up.
 It's hard to see but there is a mark at the top of the louvers, to make sure you don't install them upside down.
 What's the glossy black thing for? I hear you say, well its black perspex that I use for gluing styrene on as it doesn't bond to the styrene when gluing. However it's a bugger to get a photo without the workbench LEDs getting in the shot.
The four vents are close to being the same size, however they won't be, just expect it, I know I do. So that I don't frustrate the life out of myself, just number an opening to a vent. That way you are trying to fit one vent to one hole, not picking up a different one each time and having to reshape a hole that will quickly become too large. You end up with a side with lots of lines and numbers, but isopropol will fix it easy!

I don't know about you, but I've found a little extra time out at the modelling bench of late. It has certainly helped keep me sane. The vents were done over two nights, during the week. A simple part that shows up really well when completed.

A quick update today, there has been some real progress on the modules with the back scene board frames being completed, so a new post shouldn't be too far away.

Enjoy the rest of the week,
modelling time is the key to happiness!
Oorroo!
Geoff.

Sunday, April 19, 2020

The Twins, part 1

There has been many different ways of communicating to each other over the years here in Australia.  Well before the telephone we had the telegraph. Since 1858, in NSW, the telegraph line linked us together, often bringing together post, telegraph, and money order to the one location. At Bulli, that was the case. The standard design for this office was doubled at Bulli, building them back to back, with a what seemed like a shared wall in the centre. I'd love a photo of the interior of this building, but unfortunately I've not been successful in sourcing one.
The building itself is not really very complex. I've sourced some novelty siding that appears the correct spacing, so out with the hobby knife and away we go! It feels like ages since I had a building project to work on, and so far it's been good. The matching of available windows from the Grandt line or Titchy group, to the scaled plan appeared a little difficult. I found two that were a good fit on the Grandt line site, however the postage was enormous, compared to the packs actual price. I continued the search through the stash, and found some that would be a fair enough fit, even though they were a twelve pane window, some careful trimming would see that fixed. 
I've been cutting out enough walls to build a double office for my layout, and an extra one, not sure why, maybe in case I bugger up something on the first, then I'll have some spares.

The photo just illustrates where I got to yesterday, and once I had a little bit of time today, I've completed the second wall cut out.
The side with the double gable and the two single windows in each, is the trackside view of the building. The side with two windowsill each gable is the public side of the building. This side also has window awnings over each, something that will be fun to model because of the gentle curve in them.
The plan I have for the building is interesting as it does not have a front elevation plan. This makes it a bit difficult to replicate the front doors, they were a pair that opened inward, that much I can see from the floor plan. It does not help me with the height of the door, or whether there was any venting above it? So a little Modellers licence here. I will be modelling the doors opened as the interior I have a good plan for, with benches and the like all marked, along with good detail of the fireplace, so we shall see. In my head I have the scene populated with people, and sourcing figures at a reasonable cost/quality is proving challenging.


I'll finish there for now. Enjoy the new week,
stay safe,
Oorroo!
Geoff.

Wednesday, April 15, 2020

Ballasted deck bridge for HH

Just over the boarder near Tenterfield there are some great examples of ballasted deck bridges. The area has been a favourite of mine for many years now. The Sunnyside bridge, and many other features along the line make it an enjoyable drive. Even after many trips there are still bridges and sidings to explore. The need to do this sooner, rather than later.as some of the bridges have begun to be removed. There are a few that are off the main road, and these ones are the ones I'm chasing. Another time for sure.

The bridge is to be on the left hand module, hopefully with a scene similar to the one caught in these photos. I've still to confirm the placement of the trackwork, and that will effect the placement of the bridge. For now I'm working on the scenery boards for each of the three main modules. This combined with the trackwork, for me, is a little fluid, and I guess that's why I like modelling a made up location, based on a real location. I'm sure the purists out there have issue with this, however as I only model small layouts I need to be more flexible. A home layout is not on the horizon for a while, and that's already planned, with a set location.
During a few of my visits to this location I have many measurements of timber sizes and spacing, but you know, I still think I've missed a few. So when I need a break from the bench work it will be out with the basswood and bolt detail for sure!


This last photo will hopefully be the scene I'm trying to replicate on the layout. There are other photos I have of the distant horizon, however I'm not sure I will be replicating the same in paint. The back scene painting should probably be the next thing I do as a distraction from track work. I'm a firm believer in having a few different projects on the go that you can cycle through.
That should be it from me till I actually have some progress to post, some photographic evidence of some modelling.
enjoy your week, only a few days to go!
Oorroo!
Geoff.

Monday, April 13, 2020

Post Easter Post

Hi Everyone!
Recently, I don't know about you, but I've had a little free time at home. It's turned out to be a good thing, we've stayed safe, remembered how to cook and entertain ourselves, and most importantly there's been some modelling time in the garage!

It has been a case of something old appearing new again, namely a weekly post on the railway blog. Let's see how I go, after all this is the first.

There has been a bit of thinking time, time to re assess, time to rethink what I thoought was a good idea, and the best bit? Progress!


Here's a couple of photos to show the front three modules up on their legs. The diagonal in the second photo is to support the two separate leg frames, so that they are free standing. The idea behind this being that the layout can be set up by one person, however I hopefully won't need to do that. The bolts goes through the timber and lock into a t-nut in the rear of the diagonal. 

I've been working on the track plan to confirm that the plan was actually going to work, on the ply, as it were. So far so good. The centre module is mostly the goods area and  small town scene. The spacing between tracks, the curves, and working with the point geometry has been time consuming. I'm pretty sure that all will be well, nothing is glued down yet so it should be ok.
I went on to work on the centre module today, adding the front and rear scenery boards. If you look at the centre front, it's very low, the 'hollow', and at the rear on the left is the high point of the layout. It always feels a little more easy to see what you're creating when these go on I think.


That's all for this weekend, I'm hoping for some more time out there soon, next up is the backscenes, and their painting. The fun part, or at least the start. With starting this part of the layout at least I get to make use of the endless cloud photos I've been taking.

Enjoy your week, stay safe,
Get out there and enjoy your hobby!
Ooroo!
Geoff.