The day to day non railway stuff can really mess up our progress sometimes. I find that my plan of ‘well I’ll have a good block of time tomorrow, so I’ll leave it till then,’ never seems to come together. This last week or so I’ve been doing an hour here and there, and seem to be making some real progress. Looking back over these last weeks and I must be honest, the ‘block of time’ technique is for procrastinators. Then I think the ‘hour here and there’ is for building your enthusiasm, after a slow down in motivation.
I looked back at the last post about backscene painting and realised that it was posted in September 2020! So it is definitely time to get this part of the project completed. Let’s have a look at where I’m up to.
The right hand panel has the horizon at its closest, with the trees right behind the Station building. At this stage I’m calling this panel done. Let’s see how long that will last! I may do a little more with the foreground behind the Station area. I won’t know for sure till I add it to the module.
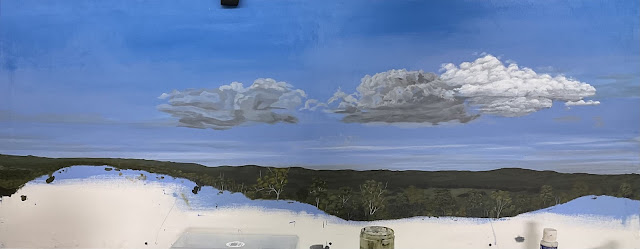
The centre panel that is behind the goods area has the horizon much further in the distance, hopefully giving a greater feeling of depth. This one I’m currently working on, but you can see the general idea. The clouds are a work in progress, and they are what I’m currently working on. I have been using acrylics with a jo Sonja paint extender to create a thinned wash like paint, but I have discovered a paint thinner that behaves like the paint it doesn’t thin it, and this can have its uses. Thinning the paint into a wash is good for blending, but using the thicker extender allows you to have greater control with the amount of pigment you apply. The ‘less is more principle’ applies here.
The left hand module has the horizon at its furthest, with a fairly flat landform that changes in the foreground to show a creek and its surroundings. It is very obvious that this one needs a lot of work, however I am happy with the volumes and colours I’ve done already. I’m looking forward to seeing how I get the creek added into the foreground.
I’ll add photos of the area I’m hoping to mimic. These three photos show a different aspect of the scene I hope to add. The openness of the scene, and the muted tones of the landscape are what I will have to try to put in, we shall see.
The colours in this one are fairly pale, with a fair amount of blue added so that they appear to recede. There will be a few clouds, however they will be centred over the distant hills, hopefully making it seem deeper
So three very different scenes, that hopefully work together. The sky and specifically the clouds aid in the transition from one to the next. There have been many reference photos taken, and referred to over the course of this project. In the end there were three or four I used, to try to keep it fairly simple. One of the biggest challenges has been the sheer size of the backscene panels. They are so much taller that my last effort, and indeed, longer as well. All this really means is that I’ve needed to plan each panel, and how it flows into the next. The paint colours I’ve been using allows me to keep to fairly similar shades and that helps make the scenes work together.
I have still a lot to do, but I thought it worth an update as it’s been awhile since my last post. I hope you are all staying safe, keep on modelling, have a great week!
Oorroo!
Geoff.


