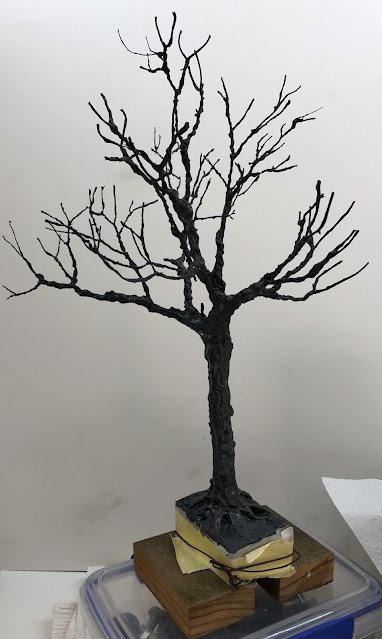
I’ve always been a modeller with many projects on the go at once. I guess progress is being made if you take into account all the partially completed projects scattered about the workspace? Maybe it’s just me. There has been a stack of paper coated florist wire just begging me to have a crack at a tree, so I did.
The wire was purchased from the florist department of a craft store, I think it was Lincraft. A hefty amount were twisted together to form the trunk, and then more added to increase the number of branches. There have been endless articles on this part of the construction, so I won’t bore you yet again. Suffice to say that I’m on about the fourth coat of modelling paste, to build up the girth of the trunk.
Here is a quick photo of the tree I’ve been working on, along with the paste. I use a bit of colour to darken the paste, that way there is less painting afterwards, before you are completed. The dark colour is the base, all the rest will be lighter.
This week I’ve pulled out a couple of photos for inspiration, of a tree I spotted whilst walking through the local park. The bark colour is fairly pale. The photo looks great, but when what you are building a scale version of the same, it’s a little difficult to have the same level of detail. I’m still getting used to this, and I think it will take quite a few more till I develop a technique that I’m happy with.
Today I had some time to spend on the trunk. A few colours on the trunk, trying to keep them to a theme. I’m not sure how well it worked, I think I maybe over thinking it really. The old ‘Keep It Simple Stupid’ should be my mantra. So I’ve gone over the trunk and reduced the number of colours I’ve used. To achieve the blackish marking on the trunk, I was thinking of using some ‘soot’ coloured weathering powder. Fairly quickly I realised that that level of colouring was too strong, so I brushed it off.
After that it it was out with the spray and some brown artificial hair. A few minutes later and here we were. A fair amount of trimming is required once I’ve allowed the Matt spray to dry, as it was looking a wee bit heavy in the branches.
There have been a few trees built at my workbench, and the variation between them is what I’m working on at the moment. To that end I did try using a different foliage flock compared to the last few I’ve built. It was a little larger, so that when applied it stayed more on the top of the branches, rather than sifting itself all through the brown. I will be using this sized scatter in future, as I prefer the look it gives. I’d appreciate your feedback on this also!A bit of a change from the previous photo. You can still see a fair amount of hair, so some additional trimming is required. I’m fairly happy with this one now, so I will put it aside with others, ready to plant on the layout.


I may have to contract you for some New England trees. Well done. Bill W
ReplyDeleteThanks Bill! Looking forward to seeing the New England area come alive!
ReplyDeleteHi Geoff. I enjoy your blog, and especially this entry. Can you tell me where I can get the artifical hair? It makes a big difference. Thanks TerryB
ReplyDeleteTerry, thank you, I’m glad there are people out there who enjoy my mutterings!
DeleteI used a company in the UK to source the fibre. It is artificial hair, used in wig making. It comes in a long plait, in various colours.
Here’s their web address:
https://www.banburypostiche.co.uk/
They were great to deal with, good luck!
Thanks Geoff. I will give them a go.
ReplyDeleteHi Geoff.
ReplyDeleteGreat to see another update and a superb looking tree .Keep up the good work.
Regards Peter
Thanks Peter, trees have been put aside for a bit now, but it is good to have them ready to go!
ReplyDelete